How to Make Kandi Bracelets: Singles, Cuffs and Trading
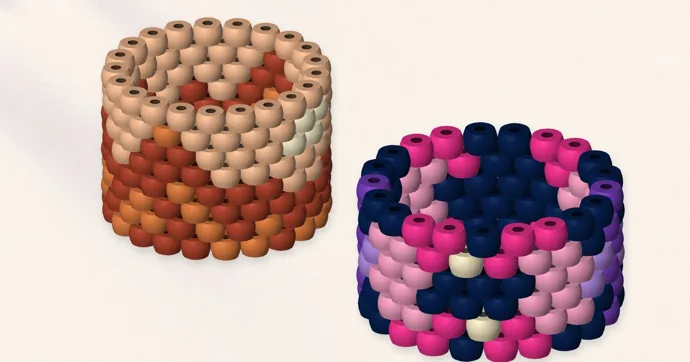
A kandi bracelet is a stretchy bracelet strung from pony beads on elastic cord, usually in bright colors or with letter beads that spell a word. Kandi grew out of American rave culture, where people make them by hand and trade them with friends and strangers at dance events and festivals. The simplest kind, a single, is one loop of beads and takes about two feet of cord. A cuff is several rows of beads stitched together into a wide band.
If you have never made one, start with a single. Once you can knot a single so it holds, a cuff is the same beads and cord with a stitch added.
| What to make | Beads | Elastic cord | Good for |
|---|---|---|---|
| Plain single | About 28 pony beads for a loop of about 7 in | About 24 in (61 cm) | First try, trading in bulk |
| Letter single | About 24 pony beads plus 4 letter beads | About 24 in (61 cm) | A word or a name |
| Narrow flat cuff | 126 beads, 6 across | About 3 yards, or 9 ft (2.7 m) | First cuff |
| Wide flat cuff | 168 beads, 8 across | About 3 yards, or 9 ft (2.7 m) | A picture or pattern band |
| Multi-stitch cuff | 160 beads, a 32-bead ring | About 3 yards, or 9 ft (2.7 m) | A round, tube-shaped cuff |
The cuff counts and cord lengths come from the patterns in our Kandi Pattern Studio set. A cuff for a bigger or smaller wrist needs more or fewer beads.
What kandi is and where the name comes from
Kandi bracelets started showing up in the Southern California rave scene in the early 1990s. The name may come from “candy necklace,” since kandi and candy sound the same. They likely grew out of friendship bracelets, which are also handmade and given to mark a friendship.
The handmade part matters to many people in the scene. Some see store-bought kandi as missing the point, because the bracelet is meant to come from the person giving it. Rainbow colors and letter beads are the classic look. People who make and trade kandi are sometimes called kandi kids.
Kandi is strung on cord, never ironed. The pegboard designs in our fuse bead ideas use a different bead and a different method.
PLUR and the kandi trading handshake
PLUR stands for Peace, Love, Unity, Respect. It is a set of principles tied to rave culture in the United States, and it has been printed on club and rave flyers since the early 1990s. In short, peace means settling conflict gently, love means acts of goodwill toward others, unity means welcoming people whatever their differences, and respect means treating others the way you want to be treated.
The PLUR handshake is a common way to trade kandi. Each word gets a gesture:
- Peace: both people make a peace sign and touch fingertips.
- Love: each person makes half of a heart with one hand, and the two halves meet.
- Unity: both people press their palms together, like a high five.
- Respect: you clasp fingers, and with your free hand you slide a bracelet from your wrist onto the other person’s hand.
A hug often follows. One convention you may see is that bracelets on the right arm are up for trade and bracelets on the left arm are keepers.
These are customs, not rules. Plenty of people trade with a simple “want to swap?” and skip the handshake, and nobody owes you a trade. Ask before you start the handshake, and keep a pocketful of singles so you have something to give back.
What you need to make kandi
Pony beads. These are the barrel-shaped plastic beads with a large hole, about 6 x 9 mm. Our patterns are drawn for beads about 1/4 inch along the hole and 3/8 inch across. Buy more of your main color than you think you need. The recipes in our set list a small optional spare for each color for exactly this reason.
Elastic beading cord. It has to fit through each bead hole several times, because a cuff passes through the same beads again and again. Test it on a few beads first. Non-stretch thread won’t work for these closed bracelets, since a closed loop has to stretch to get over your hand.
Letter beads if you want words. They come in different sizes, so a letter single may need a spacer or two added or taken out.
Small scissors, a bead tray or a shallow dish, and a stop bead. A stop bead is any spare bead tied loosely at the end of the cord so your work doesn’t slide off. It comes off at the end and doesn’t count in the pattern.
Pony beads are not fuse beads. Fuse beads are the small tubes you lay on a pegboard and iron flat, and they are a different craft. If that is what you have on the table, see how to iron fuse beads or the fuse bead keychain guide instead.
Kids and loose beads
Pony beads are small parts. Federal rules treat toys with small parts that are meant for children under 3 as a choking, aspiration or ingestion hazard. Keep the bead tray off the floor and out of reach of babies and toddlers, and count beads back into the box when you finish. Kids old enough to keep beads out of their mouths can string a single with you nearby. A cuff takes far more stitches and more patience, so try one yourself before you hand it to a child.
How to make a single kandi bracelet
A single is one strand of beads on one loop of cord.
- Measure the wrist. Wrap a strip of paper or a soft tape around the wrist where the bracelet will sit, and add a little room so it can roll over the hand.
- Work out the bead count. Each pony bead takes up about 1/4 inch of cord. A 7-inch loop is about 28 beads, and our letter strands use 24 pony beads plus 4 letter beads to make 28 positions, about 6.6 in (16.8 cm) around.
- Cut the cord. About 24 in (61 cm) leaves long tails for knotting.
- Add a stop bead or a clip at one end so beads can’t slide off.
- String the beads in order. For a letter single, put the word in the middle and string left to right so the letters read the right way when the bracelet faces out. Check that every letter face points outward.
- Test the fit before you knot. Hold the ends together and wrap it around the wrist. Too tight or too loose? Add or remove a matching pair of beads, one from each side of the word, so the pattern stays even.
- Tie it off. A surgeon’s knot holds well on stretchy cord: it is a square knot with an extra wrap on the first throw, and that extra wrap adds friction so the first half doesn’t loosen while you tie the second. Pull it snug, then follow any knotting directions that came with your cord.
- Hide the knot. If the knot fits, slide it inside the hole of a neighboring bead, then trim the tails.
The common snag is knotting first and checking later, then forcing a tight single over the hand. Don’t force a closed bracelet on. Check the size while the ends are still open, when adding a pair of beads is easy.
How to make a kandi cuff
A cuff is any kandi bracelet with more than one row of beads. The three most common cuff stitches are multi-stitch (an even-count tubular peyote stitch), flat peyote and x-base. Peyote stitch is an old beadweaving stitch, also called gourd stitch, in which each new bead sits in the gap between two beads of the row before. That is why the rows look staggered, like bricks.
The two cuffs below are the ones our patterns use. Leave a long tail and work with about 3 yards, or 9 feet (2.7 m), of cord for either. X-base builds rows a different way, and it is not covered here.
Flat peyote cuff: a band zipped into a ring
A flat cuff is woven as a straight strip and then joined end to end. A narrow band is 6 beads across and a wide band is 8. The steps below are for a wide band; a narrow one is the same with smaller numbers.
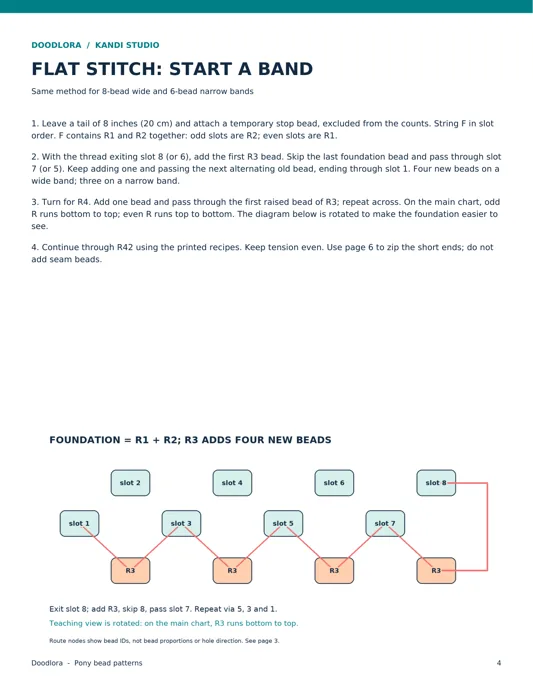
- String the foundation. Leave an 8 in (20 cm) tail with a stop bead. String the first 8 beads of the pattern in order. These 8 beads are the first two rows together, because in peyote the odd slots become row 2 and the even slots row 1.
- Make row 3. With the cord coming out of the last bead, add one new bead, skip the last foundation bead and pass through the next one. Repeat: add one, skip one, pass through one. You end up adding 4 new beads on a wide band (3 on a narrow band), and those new beads stick up.
- Turn and make row 4. Add one bead and pass through the first raised bead of row 3. Repeat across. From here on, each new bead goes into a gap between two raised beads.
- Keep going to row 42, 4 beads a row. Keep the tension even, snug but not so tight the strip curls.
- Zip the ends. Take off the stop bead and bring the two short ends together with the design facing out and no twist. The raised beads on one end fit into the gaps on the other, so you pass the cord back and forth between the two ends like a zipper. Don’t add beads in the seam.
- Finish. Weave back through beads that are already there to reinforce the join, knot the cord, and bury both tails inside the beadwork.
The snag here is the zip. If the two ends don’t line up, count your rows before you force it closed. A wide band in our set has exactly 42 rows, and a missing or extra row leaves the seam a bead out.
Multi-stitch cuff: a round tube
A multi-stitch cuff is peyote worked in the round, so it comes out as a tube with no seam to zip.
- Make the ring. Leave an 8 in (20 cm) tail and string 32 beads. Close them into a ring without twisting it, and knot the cord.
- Add round 3. The 32-bead ring already counts as rounds 1 and 2, so the first beads you add make round 3. Add one bead, skip one bead of the ring and pass through the next. Go all the way around. That is 16 new beads.
- Step up. At the end of each round, after your last new bead, pass through the last old bead and then through the first new bead of the round you just made. Now you are in place to start the next round.
- Repeat for each round, 16 beads at a time. Our cuffs stop at round 10, which comes to 160 beads.
- Finish by weaving back through existing beads, knotting and burying the tails. Check the fit and the stretch.
The snag is the step-up. If you are already coming out of the last old bead, pass through only the first new bead. Going through one extra bead throws the whole next round off by one.
How to read a kandi bracelet pattern
A kandi pattern tells you two things: where each color sits, and what order to string the beads in. Our Kandi Pattern Studio patterns split those across two facing pages for each design.
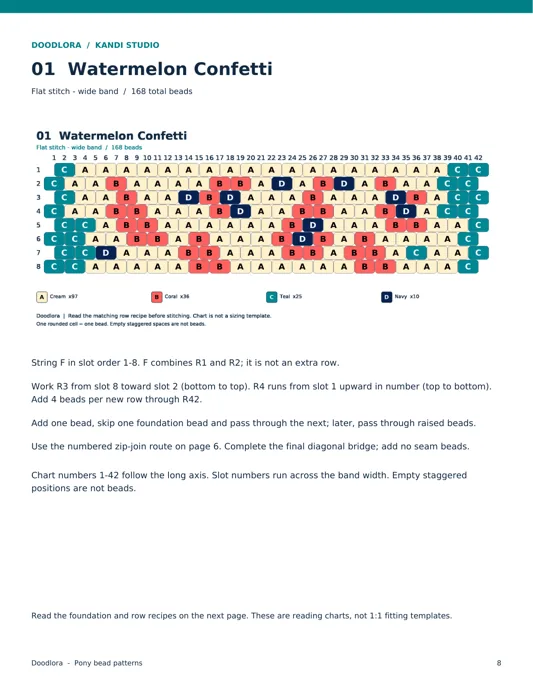
The chart page shows the whole band laid flat. The numbers 1 to 42 run along the length; those are the rows. The slots 1 to 8 run across the width. Each rounded cell is one bead, and the empty staggered gaps are not beads. The letters A to H on the beads are color codes, and they reset for every design: in Watermelon Confetti, A is cream, but in another pattern A may be teal.
The recipe page lists every color with its exact count, then gives the order to string in. “F” is the foundation line. Each later row is written in the order your needle meets the beads, so in Watermelon Confetti a row 3 line that reads “C C A A” means it gets teal, teal, cream, cream. Odd rows run bottom to top on the chart and even rows run top to bottom. String from the recipe, then glance at the chart to check you are on track.
Tube cuffs add a start point. “R04 from C02” means round 4 starts at column 2, because the step-up shifts the start one column each round.
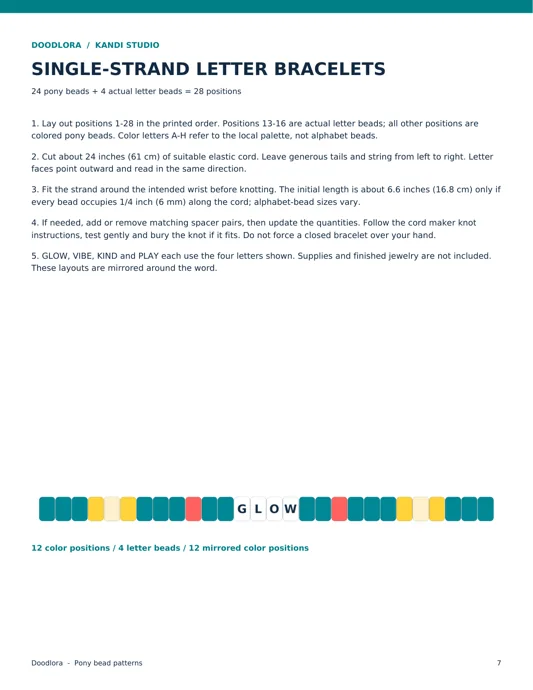
Letter singles are written as positions 1 to 28. Positions 13 to 16 are the real alphabet beads. Every other letter in the recipe is a color code, so in the KIND recipe a “C” at position 5 means a cream bead, not a letter C.
Kandi bracelet ideas
For trading. Make a stack of plain singles in rainbow order or two alternating colors. They are quick, and you can hand them out freely.
For a word. Pick a 3 to 5 letter word that means something to you or to the person you are trading with, center it, and mirror the colors on each side. Our set includes GLOW, VIBE, KIND and PLAY layouts, and you can swap in any four letter beads you like.
Matching sets. String the same color sequence for a group of friends, and give each person their own initial in the middle.
A first cuff. A narrow flat band in two or three colors, such as stripes or chevrons, is the easiest to keep track of. Save picture cuffs with six or more colors for after you have zipped one seam.
A keeper cuff. A wide band or a tube cuff with a pattern, like waves, diamonds or hearts, takes much longer, so it is more often a keeper than a trade.
Kandi bracelet patterns to string next
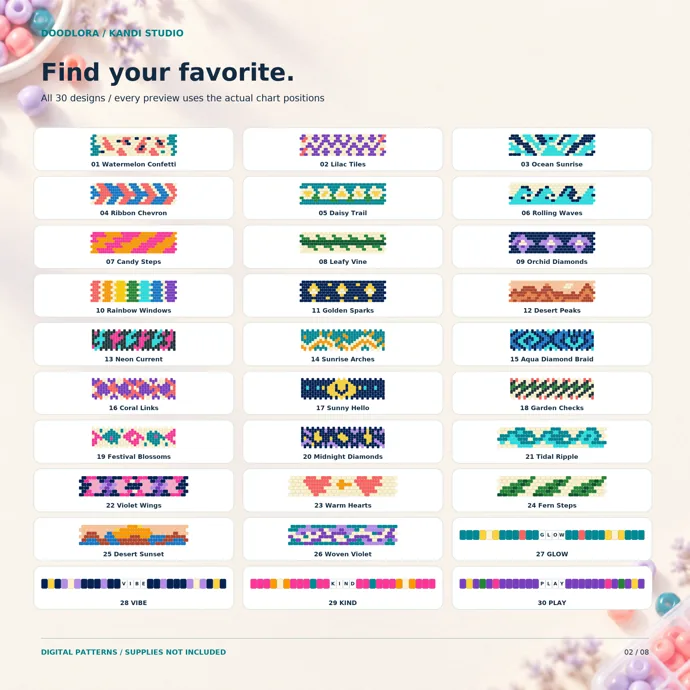
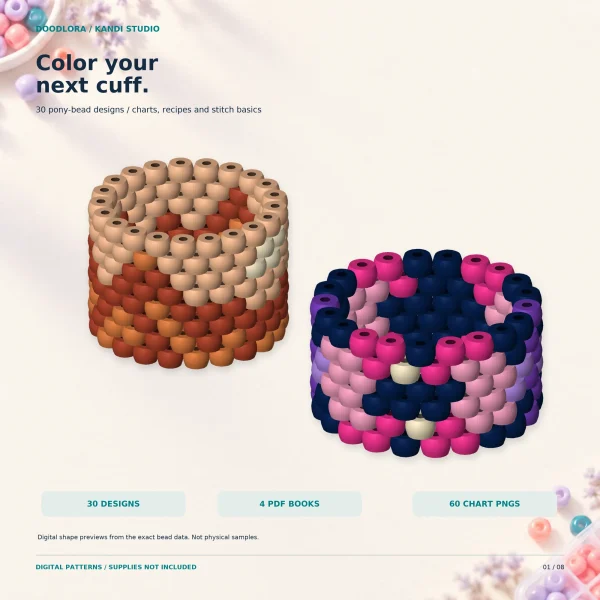
Our Kandi Pattern Studio set has 30 pony bead bracelet patterns: 12 wide flat bands, 6 narrow flat bands, 8 multi-stitch cuffs and 4 letter singles. The PDF has four how-to pages up front for starting a flat band, building a tube cuff, zipping a seam and laying out a letter strand. Each design then gets a chart page and a color key with a row-by-row recipe. There is a full-color version and a symbols version that prints the same positions as letters on white to save ink, in US Letter and A4. Beads and cord are not included.
The sizes in the book are estimates for reading the charts, not wrist templates. Bead brands vary a little in size, so make a short practice strip with your own beads and cord before you start a full cuff.
Fixes for common kandi problems
The single is too tight or too loose. Cut the knot, add or remove a matching pair of beads, and re-tie. Pairs keep a mirrored pattern even.
The knot keeps slipping. Use a surgeon’s knot, pull both halves snug, and slide the knot inside a bead so it isn’t rubbing on your wrist.
The letters read backward. You strung right to left, or flipped the bracelet. Lay the beads out on the table first and string them in order from left to right with the letter faces up.
The cuff seam won’t close. Count the rows on both ends. One extra or missing row throws the zip off; don’t add a bead to fill the gap.
A tube cuff spirals the wrong way. Check your step-ups. Passing through one bead too many at the end of a round shifts every round after it.
You ran out of the main color. Buy a few extra of each color before you start. The spare count in a pattern recipe is a good guide.
If you are planning a making night with friends, our craft ideas for adults has more projects that fit around one table.
Printables from this article
Related articles
Fuse Bead Patterns
Pony Bead Animals: Keychain Ideas and How to Lace Them
How pony bead animal keychains are laced on one folded cord: what beads and cord to buy, how to start on a keychain ring, read a row recipe, widen and narrow rows with clear support beads, tie off the last row, and run it with kids at a party or in a classroom.
Fuse Bead Patterns
Crafts for Kids 6-12: Ideas for 8 and 10 Year Olds
Sixteen crafts for school-age kids, split into one-sitting projects for younger kids and longer builds for 9 to 12, with supplies, time, stopping points and common mistakes.
Fuse Bead Patterns
Ocean Crafts for Kids: Jellyfish, Whales and Fuse Beads
Fourteen ocean crafts for preschoolers, school-age kids, teens and adults, with what to prepare, how long each one takes and where each one usually goes wrong.