 1 / 5
Strawberry Life Cycle Coloring Pages: 20 Strawberry Plant Pages from Seed to Berry, Runners and Flowers, with Color Guides
Twenty pages that follow a strawberry plant rather than the fruit alone, starting with seeds pressed into soil and moving through sprout, roots, flowers, berries and runners before heading out to pots, rows and the harvest basket. Every page is titled at the top and lists the plant parts it shows (leaf, runner, flower, berry) at the bottom.
$3.99
Buy any 3 or more printables and save 20% at checkout.
- Download right after payment — link works for 30 days, up to 5 downloads
- Files arrive as a ZIP with your license PDF inside
- Secure checkout by Stripe · Refund policy
This strawberry life cycle coloring book starts underground. Design 01 shows a halved strawberry with its seeds on the outside and a hand pressing seeds into the soil, and design 02 cuts away a block of earth so you can see the first sprout’s roots under a watering can. From there the plant grows a page at a time until it sends out a runner and starts a new plant of its own.
The growth pages, in order
The first seven designs work as a sequence you can use for a plant lesson:
- Strawberry Seeds: the halved berry and seeds going into the ground.
- First Sprout: two leaves above the soil line, thin roots below it.
- Young Plant: a fuller plant in the sun with a wide spread of roots drawn under the ground.
- First Flower: one open five-petal flower and two buds among the leaves.
- Growing Berries: a flower, a small unripe berry and a full-size one on the same plant.
- Mother and Daughter: a parent plant with flowers and berries, joined by a runner to a small plant that has put down its own roots.
- A Strawberry Runner: the same idea pared down, two plants and the stem between them on a strip of soil.
Later, design 17, From Bud to Berry, puts a closed bud, an open flower and a young berry side by side on one plant, which is handy for a quick review at the end.
Where strawberries grow, and who visits
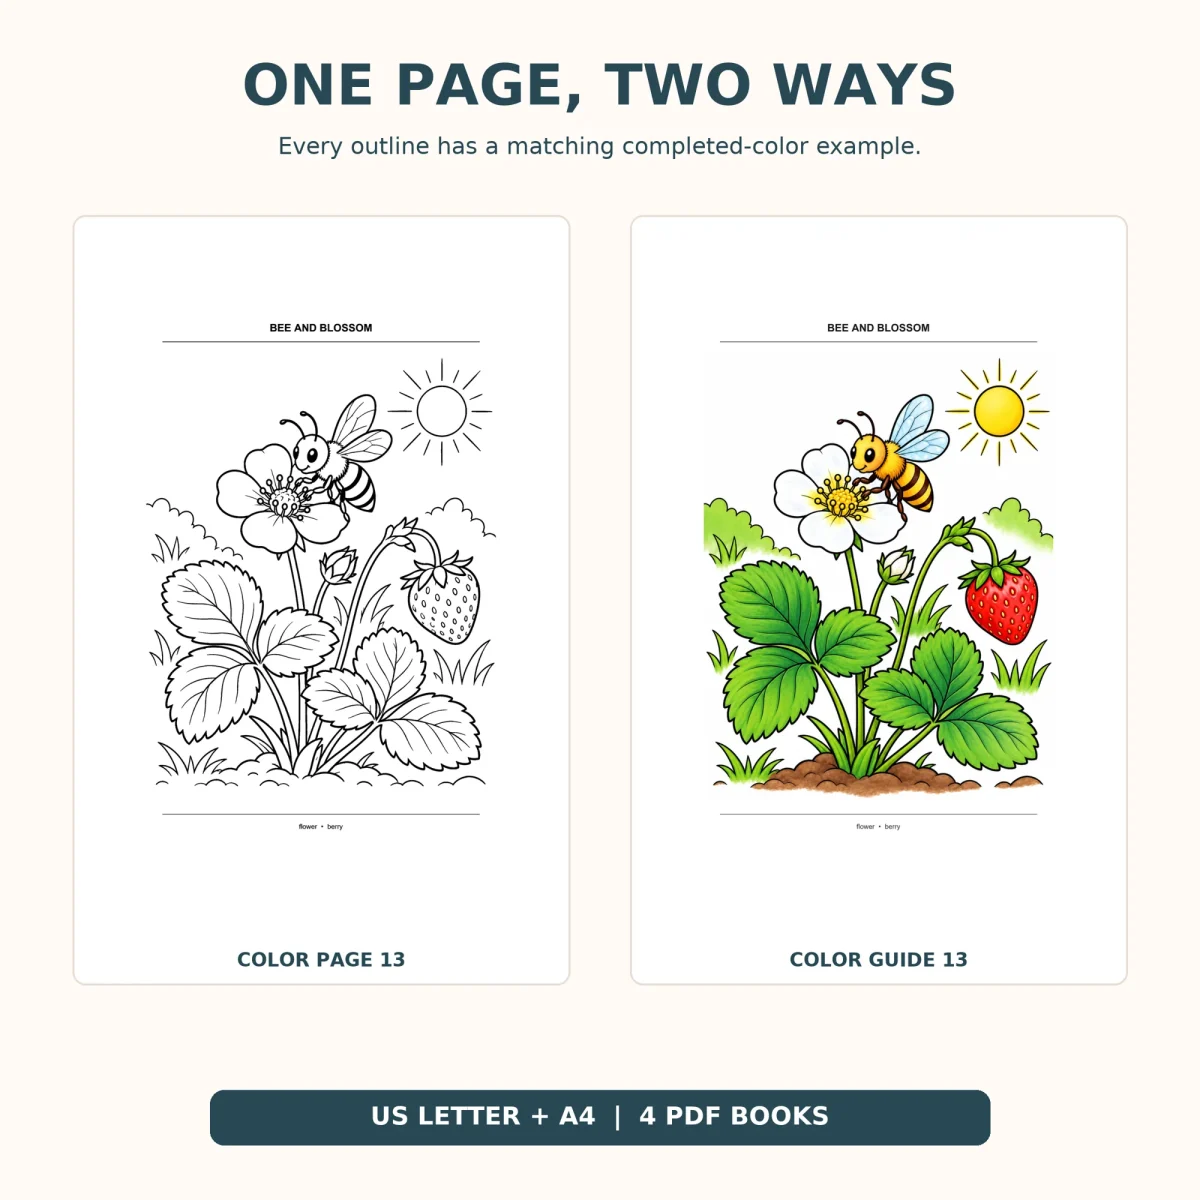
Designs 08 to 12 move the plant around: a wooden raised bed, a clay pot on a porch, a hanging basket with berries dangling over the rim, long field rows running back to a fence and hills, and a spring patch with a picket fence and a watering can. Designs 13 to 15 each add one garden visitor, a bee on a blossom, a ladybug on a leaf and a dragonfly over the flowers. Design 16 is a single large flower with its center of stamens, and the book ends with a girl in overalls picking berries into a basket, a full harvest basket beside the plant, and Inside a Strawberry, a whole berry next to a halved one with the streaks of the flesh showing.
Labels on every page
Each page has its title in capitals across the top and a small line of plant-part words underneath the drawing. A page shows one to four of them: leaf, runner, flower, berry. Children who can read a little can find each named part before they color it, and the runner pages (06, 07, 12, 18 and 19) are the ones to point to when you explain how a strawberry plant spreads. If you were looking for a strawberry plant coloring page rather than a single piece of fruit, nearly every design here has leaves, stems and roots or soil in it.
Line weight and the color guide
The outlines are clean and medium-weight, with veins drawn into every leaf and seeds dotted on every berry. Design 07, the runner, and design 01 leave the most white paper. The four busiest are 19 (the harvest basket, with a woven basket heaped with berries), 18 (the girl picking), 11 (the field rows) and 12 (the spring patch), so save those for children who like small spaces or for colored pencils.
The color guide paints the leaves in bright greens, the flowers white with yellow centers, the berries red with yellow seeds, and the soil in browns and tans. It’s a finished example to look at while you color, on screen or printed, and the designs run in the same order in both books.
Printing
Print the line-art book at actual size, one page per sheet, and skip any fit-to-page option. Each drawing stays inside a half-inch margin on US Letter, with the title and labels inside the printed area, so nothing gets trimmed. To make one sequence card per child for a life cycle lesson, print pages 2 to 8 of the PDF, which are designs 01 to 07.